– Fly Tying Tips & Tricks –
For me it always seems that November and December are so busy that I never make it down to the my tying desk.
It’s usually about the end of January that my life gets a bit of a lull and I can get serious about filling the gaps in my fly boxes and tying up some new patterns! With that in mind, I thought I’d post up a few handy dandy practical DIY tying tips that you can try and see if they work to make things a bit easier as well as save you time & money!
None of these tips are actually mine but just some neat stuff I’ve picked up over the years. Some you may have seen but others might be new to you. And with that roll the tips……..
Fly Tying Tips | Control Your Spool!
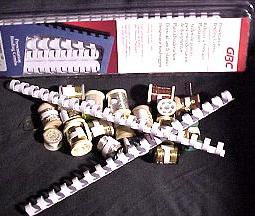 To control your spools of tinsel, thread, ribbing (and any other fly tying material that comes on a roll) make a trip to the office supply store and pick up some plastic binder rings.
You need to get the 3/4 inch ones and then all you have do is cut them with scissors between each ring and wrap them around the spools … viola!
Fly Tying Tips | De Kink Your Chenille!
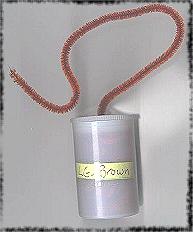 Nothing is more annoying then unraveling your chenille from a card or out of a package and it’s all matted with creases every three inches. To solve the problem just run your chenille through the steam of a kettle. This will plump it up to it’s original shape!
Once you’ve done that store it in a 35 mm film can with a hole drilled in the lid. Not only does the container work for storage but now you can tie right out of the can with virtually no waste!
Fly Tying Tips | Keep Your Boots Dry & Float Your Fly!
![]() Go to a boot store and pick up some silicone for treating boots. You’ll find that it’s about a tenth of what you pay for fly dressing silicone. Okay that’s not the tip although it’s a good savings ……. 😉
Go to a boot store and pick up some silicone for treating boots. You’ll find that it’s about a tenth of what you pay for fly dressing silicone. Okay that’s not the tip although it’s a good savings ……. 😉
When you are tying your dry flies after there are completed drop them into a dish of silicone and let them sit for 5 -6 minutes. Take them out and dry them on paper towel for a couple of days then you can throw them in your fly box. The next time you need them they will float like corks and you won’t have to stop and apply floatant! Plus it doesn’t leave a slick on the water like what is left behind with the pastes and liquid dry fly floatants!
Fly Tying Tips | Turn Peacock Herl Bronze with the Sun!
If you tie with Peacock herl and who doesn’t here’s an easy way to get bronze herl. Just remove and string out the normal Peacock herl in a window that has a lot of sunlight. Turn to the opposite side each day and after a couple of weeks you will have a bunch of bronze herl……just to easy and a killer on most patterns straight up or mixed with the natural herl.
Fly Tying Tips | The “Ergo” Bobbin!
This one is more of a comfort thing and might not be for everyone … but if you have a old bobbin give her a bend and see if it works for you!
Fly Tying Tips | Back Up Your Cone Heads!
When tying with coneheads it’s always a bit of a struggle to fill that gap at the back of the cone. By just adding a plastic bead ( your choice of colour) you fill the void and can add some colour to your head.
Fly Tying Tips | Bobbys for Beads!
When tying with beads for heads or bodies a neat trick to organize them and make those little buggers easier to get a hold of is to string them on bobby-pins. Put different sizes and colours on a pin and store until you need them!
Fly Tying Tips | The Dubbing Martini / Shaken Not Stirred!
Mixing your own dubbing is a great way to get a unique colour or flash that you can’t buy. In the old days carding brushes were used with wool and seal to create dubbing. Now a days a lot of people use little coffee grinders to mix up the dubbing. The problem I have with this is it can damage some of the mix and chop it smaller than you might wish. Well there is a real cheap solution to this problem and all you need is water!
Throw your mix of dubbing/hair/crystal flash or whatever into a container filled about half full of water. Now do your best James Bond impression and pretend your mixing a martini … shaken, not stirred, of course! Shake the crap out of it and when you’re done pour through a strainer and allow it to sit till it’s dry and then fluff it up and package it. That’s it. No fuss, no muss and no damage or changes to your original mix!
Well there you go a few neat little fly tying tips that might make your life a bit easier while at the bench! Try them out and see if maybe one or two find their way to your tying program.
Gord FlyGuys Northern Division
*** for more flyguys.net original fishing projects please hit up our complete projects list here!
Like our stuff? Subscribe by ![]() Feed or
Feed or ![]() Email
Email .jpg)







Awesome Gord! I especially like the boot dressing tip! The whole floatant things is a real PITA & often deters me from even switching over to a dry … but with this little trick I’ll be ready to go a soon as the little May’s and (hopefully) big travelers start popping!
Rob that’s got to be your fly desk because it sure bears no resemblance to mine! I’m more of a full contact tier, there’s stuff flying everywhere.
Yup it’s mine … probably as neat as I’ve ever seen it 😉