DIY Wire Dubbing Brush Maker
A quick surf through our fly tying sections and you will quickly notice that we prefer, and strive to create, simple and durable fly patterns. One of the tools which helps us to accomplish these goals is our home made wire dubbing brush maker!
The wire dubbing brush maker is a very kewl concept. It was introduced to us by Graham of the old Kamloops “Fine Flies for Fishermen” fly shop and, as the name implies, allows for the spinning of dubbing between wire as opposed to the traditional method of using thread. The result … a dubbing brush of superior strength!
Now why would you want to take the time to build a wire dubbing brush maker when you could just head to the store and purchase one? Well, no reason really, other than the fact that you’ll spend a whole bunch more money for a product that won’t do anything more for you than a home made version will. But hey money’s not everything so if the DIY idea is not your cup of tea then no worries – a quick Google search reveals that you can get similar units delivered right to your door step from anywhere between $50.00 – $250.00 (plus taxes and shipping of course)! On the other hand, if you’re the kind of guy that likes the satisfaction of “doing it yourself”, along with saving a bit of money while your at it, then this project is definitively for you! 😉
DIY Wire Dubbing Brush Maker – Parts:
- 1 12″x4″x3/4″ piece of MDF board
- 2 Beveled Rubber Faucet Washers
- 2 3/4″ Wood Screws
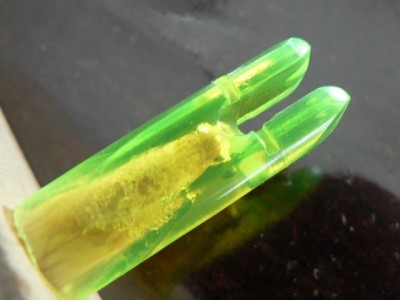
- 1 Arrow Nock
A quick trip to any Home Hardware(ish) type hardware store will get you all of the above post haste … all except the arrow nock that is. That one took us a bit longer but we finally found what we were looking for in a toy arrow at the Dollar Store!
And best of all you should be able to get it all for a grand total of about $5.00 … or even less if you can find a piece of scrap MDF! 😉
DIY Wire Dubbing Brush Maker – Tools:
- Screw Driver (head to match wood screws)
- Drill (bit size slightly larger than arrow shaft diameter)
- Hack Saw (or Dremel tool)
- Wood Glue
- Pencil
DIY Wire Dubbing Brush Maker – Assembly:
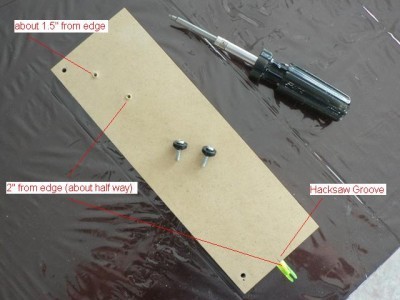
First things first we need to measure for and drill 3 holes and the first of these holes is for the arrow nock on the bottom edge of the board:
- Measure half way across the bottom edge of the board and mark it with your pencil.
- Use the hack saw to cut the toy arrow about 3/4″ above the nock.
- Find a drill bit just slightly bigger than the diameter of the arrow shaft and drill a 3/4″ deep hole on your mark.
- Apply some wood glue to the arrow shaft and install it into the hole you just made.
- Adjust nock and let set with the openings in the “V” at 12 and 6 (see picture above)
The second and third holes are made on top of the board and are for the faucet washers:
- Measure and mark a point 8″ from the edge of the board that you just installed the arrow nock in and about half way across from the side edge. *Use the same distance from the side edge for this hole as you did for the arrow nock hole. (see picture above)
- Measure and mark a second point 10″ from the edge of the board that you just installed the arrow nock in and about a third of the way across from the side edge. (see picture above)
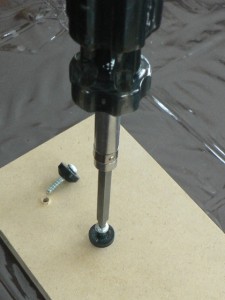
- Use wood screws to install the faucet washers into these 2 holes flat sides up. (see picture on the right)
Next we need to take our hack saw (or dremel) and make a small 1/2″ or so groove on the top of the board directly above and in line with the arrow nock:
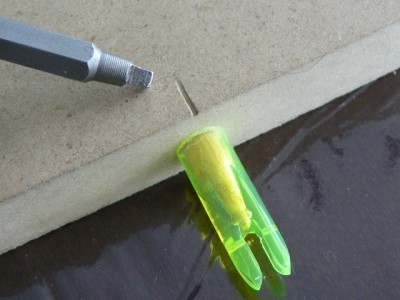
And finally, we need to flip over the board and using the hack saw or dremel tool make a small groove across the bottom of the plastic arrow nock:
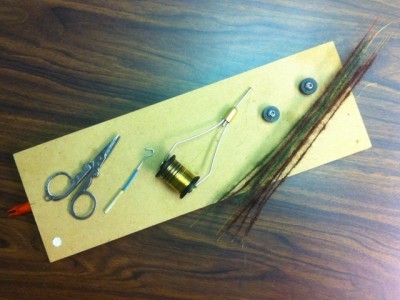
And once your done all that you should have a product that looks something like this:
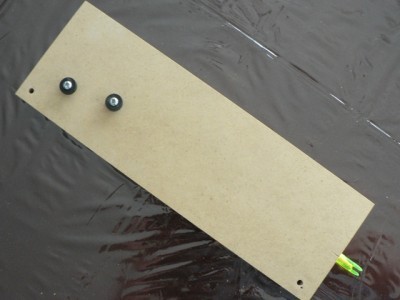
… the finished product! (disregard the 2 extra holes – I use them to mount the board to my tying bench)
OK I know what your thinking … how the heck is this crude looking piece of fly tying furniture going to help me to tie stronger fishing flies??? 😕 Well, mount up a spool of fine wire into a bobbin, grab a bag of your favourite dubbing and sit back and watch the following instructional video! 😉
DIY Wire Dubbing Brush Maker – The Video:
DIY Wire Dubbing Brush Maker – Version 2.0
Edit June 2018: Just recently the need arose for another DIY Wire Dubbing Brush maker. During the process of planning to procure the materials it occurred to us that almost 8 years later there may be a better way to to skin this cat. The brainstorming began and, although the original concept is still very solid and therefore remained intact, we managed to dramatically simply the process while utilizing a more modern and durable base material.
The new design eliminates the need for all the “extra” parts by omitting the secondary wire lock post and building the wire/dubbing hook holder (the arrow nock) right into the system. The new material makes the board lighter and stronger. Initial trials have proven successful so we are happy to introduce the Super Simple Wire Dubbing Brush Block 2.0!
If you are interested in purchasing a new version of our Wire Dubbing Brush Block, or if you would simply like more information, please contact us here. 🙂
DIY Wire Dubbing Brush Maker – Tips & Tricks:
You can use wire dubbing brushes on any fly that you currently use dubbing on. A good rule of thumb is to try and match the colour of the wire with the colour of the dubbing that you are using or with the colour of the rib (if any) that you are using. Also, the smaller the fly the smaller (finer) the wire you should use. When forming the dubbing brush try to spread out the dubbing evenly to avoid building up any lumps in the brush … but if it happens simply use your scissors to even things out. To see a wire dubbing brush in fly tying action you can check out the video on our Triple F Leech post.
That’s it folks … enjoy! 😀
*** for more flyguys.net original fishing projects please hit up our complete projects list here!
Like our stuff? Subscribe by ![]() Feed or
Feed or ![]() Email
Email .jpg)

